Diesel Service Report, October 31st, 2020
This is a summary of the status of the locomotives, other than for the Fairbanks Morse SF560 which was covered in a separate restoration progress report.
USAF1601
When the locomotive arrived at the museum several years ago, two of the four traction motors were bypassed electrically. That meant that the locomotive had been operating on just two traction motors. An inspection of the cut-out traction motors showed damage to each of the commutators. This was most likely caused by operating too long without checking brushes. When the brushes wore too short, arcing took place between the commutator segments and the brush holders. The arcing severely damaged the copper commutator segments on one motor and moderately damaged the second one.
A few months ago, a replacement locomotive truck was purchased that included two replacement traction motors that were supposedly in good condition. Rather than change just the traction motors, it was decided to swap complete combo’s, which is the traction motor, gear case, and wheel and axle assembly. That was thought to be easier and less risky than attempting to remove pinion gears from the replacement motors and then go through a realignment of the ring and pinion gear.
After that combo swap work was complete, it was noticed that one of the newly purchased combo’s had excess movement in the axle to gear housing. There should have been no movement because the axle is supposed to be held solid by a bearing. Yet it had half an inch or more of loose play fore and aft. That meant that combo had to be removed from under the locomotive to see what was wrong.
 It had been assumed that the original faulty combos under the locomotive were disabled due to the traction motor commutator damage. However, when the locomotive was being moved, Carl Pickus notice that the wheel set on one combo was turning but the traction motor was not. Once the combo was removed, an inspection cover was removed and inspection showed that the pinion gear on that traction motor had no teeth left on it. They had been worn or sheared totally away. It looked like someone had taken a metal lathe to the pinion and cut off all the teeth. Below is a picture of a good pinion gear. All of those teeth are totally gone on one of the traction motors that we thought was faulty just because of a damaged commutator. A replacement ring and pinion gear set are priced at roughly $9000. Fortunately the locomotive truck that was purchased had two traction motors that we might be able to use as a replacement.
Then the problem got worse. Inspection of the newly purchased traction motors revealed that the pinion on one of those was also severely damaged and could not be used. Plus that combo was the one that had a bad journal bearing. Yet, the traction motor itself appeared to be in excellent condition.
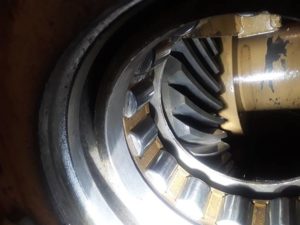 The pinion gear mates with a ring gear inside the gear housing. This (left) shows that ring gear and the input roller bearing that supports the traction motor pinion shaft on the end.
So then we were left with two bad combo’s. One that came from under the locomotive and one that was purchased when we bought the complete truck. One of the purchased combo’s was in excellent condition and it will be used under the locomotive. However, one combo from under the locomotive is not usable. That means that we have to use the other combo from under the locomotive. But it has a damaged commutator on the traction motor. The choice then was to decide if we should swap traction motors or try to get the original commutator repaired. Research into swapping the pinion gears quickly revealed that the tooling needed to remove and install pinion gears is almost non-existent. We only know of one set in the US and its not available to borrow. So, the decision was made to have the less damaged commutator repaired. The company that does that work looked at the damage and they think they can repair it.
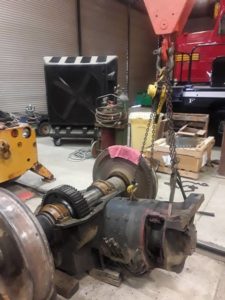 This next picture (right) shows what a complete combo looks like. There is a double reduction gear arrangement inside the gear box. The large gear that can be seen, is the final drive gear that turns the axle. The chain hoist is attached to the traction motor and the armature commutator can be seen inside the right hand side of the motor housing. When buying a complete truck from under a scrapped locomotive, you never know for sure what you will get. And there is no way to fully inspect it ahead of time. In this case, we paid $10,000 for the complete truck. For that we acquired two good traction motors and one good gear case plus miscellaneous spare parts. Buying traction motors by themselves was priced out at $6000 each plus shipping. So in the long run, we made the right decision to buy the complete truck, sight unseen.
The armature with the slightly damaged commutator is our for repair and should be back shortly. Once it is returned, it will be remounted to its original gear case and put back under the locomotive. In summary, the total repair to the locomotive running gear including replacing one combo totally and repairing a commutator on the other faulty combo. Plus a lot of repair work that was required to correct a number of problems that were found.
As part of that work, other problems were uncovered. Some of the brake cylinder internal springs were broken. Some of the cylinder pads were worn out, and the center bowl bottom liner was worn out. All of those parts have been purchased and are on-hand. After the trucks are reassembled, they can go back under the locomotive and the traction motor wiring can be restored back to its correct configuration.
OERM 1975
During last winter’s rains, water crept into one of the journal boxes and all the oil floated out the overflow. With no oil in the journal box, a hot box quickly developed and the friction bearing journal brass was damaged beyond repair. Three new brasses had been purchased but need to be machined before being used. We are waiting for that work to be done in the machine shop.
OERM 1956
It was reported that there was low fuel pressure. It turns out that the fuel lift pump is very worn and has difficulty priming. It can take up to a minute or more for the pump to prime. But the problem becomes more noticeable when the fuel in the fuel tank is low. When there isn’t much fuel in the tank, the lift pump has to lift it higher. If the fuel tanks are full, the level is above the level of the pump and it primes easily. Near term the recommendation is to fill the fuel tank until we have time to rework another pump head to give betting suction for priming. The locomotive is functional as is but it would be better if more fuel were in it or if the pump could be repaired.
SP1474
For a number of years, the locomotive would have intermittent problems when it tried to transition from low speed to high speed. One of the parallel contactors would not close. The problem would never stay long enough to prove what the cause really was and all interlocks seemed to be OK. In one more attempt to find the problem, it was thought that the problem may be in the air operated plunger in the parallel contactor. If it becomes sticky, especially when cold, it may not close properly. In an attempt to see if that is the case, the control air pressure has been raised from 89 psi to 92 psi. Only time will tell if that was the issue. If it seems to solve the problem, we will try to inject a small amount of mineral oil into the air line feeding the parallel contactor. That will lubricate the piston cup inside the cylinder.
SP006
A week ago, the bell ringer began to leak air and the bell would not ring. That will be looked at in the next few days. This bell is also rigged to be able to ring it with a bell cable in the cab but that cable was never fully routed back into the cab. That’s something that still needs to be done.
USAF 7441
The locomotive had an overheating problem about six weeks ago and hasn’t been used since. Frank Kunsaitis found that the petcock drain valve was open but mostly plugged with rust. Apparently the rust plug had come loose and the water drained out and wasn’t noticed. After the petcock was closed, the water level seemed stable. However, in the meantime, the batteries died and need to be recharged. Once they are charged, the locomotive should be able to be used again.
SP3100
Water was leaking around the new hatch cover on the coolant expansion tank. A few months ago, during the major overhaul of the cooling system, a neoprene gasket was used under the hatch cover to fill in the rust pits in the metal. As time goes on, the neoprene continues to compress and, as it does, its water tight seal is lost. We were aware of that risk when the gasket was made so wing nuts were used on the hatch cover studs. Those nuts can be finger tightened to stop the leaks when water starts to seep out around the gasket. Hopefully the neoprene will stop compressing and form a long term good seal.
UP942
Operations reported that the Gyra-light was not working. Frank investigated and found that both headlight bulbs were burned out. Once they were replaced, the light worked properly again.
SF108
Nothing faulty to report, fortunately.
Dave Althaus