Diesel Service Report, September 25th, 2021
SF560 Fairbanks Morse H12-44 Restoration Project
Richard Berk and John Salvini have finished installing the exhaust manifolds. During that process, they noticed corrosion pitting on seal areas where water jumpers connect the exhaust manifold cooling water to the power cylinders. John is using a small abrasive emery wheel to smooth out those areas. Once that is done, the water jumpers can be reinstalled.
Frank Kunsaitis installed the newly rebuilt radiator shutter pistons. They were then connected to the air lines and tested. The shutters now open and close very smoothly. Their cycle time is about 3 seconds from fully closed to open. There is no slamming or loud noises when the shutters open or close so it appears that portion of the project is complete. The piston cylinder leathers were found to be totally hard and unserviceable. Carl Pickus fabricated new pistons using a special plastic and an “O-ring” seal. His design worked perfectly. The cooling water thermostat, air valve to operate the shutters, and electrical contactor to operate the cooling fan, are all installed and tested. The next task will be to install the wiring, terminal boards, and circuit breaker to connect 75VDC to the main cooling fan.
Tom Platten has continued to needle gun the trucks in preparation for eventual painting. It is not known yet if we will have to remove the trucks for anything during the project. If we do remove them, then additional work will go into cleaning and painting them. If we don’t remove them, as much of the truck area as possible will be cleaned and painted but it won’t be as complete as it would be if the trucks were totally removed. None of this has been determined yet.
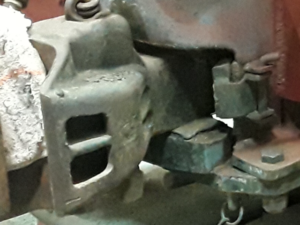 Carl continues to refurbish the body damage. The hand rails have all been straightened out and one coupler shank had to have a new shim installed to adjust the coupler knuckle to the correct height above the track. This shows the front coupler and the amateur attempt that someone had made years ago to shim up the coupler. And it shows the homemade angle stop that has now been removed.
 Carl removed the angle stop and old shim and installed a new shim to get the coupler knuckle height correct. Its always amazing to see some of the poor craftsmanship that was used when these locomotives were in service. Its as if their motto was to “Just get it done quick and get it back into service”. Seeing Carl’s quality of work on projects like this, is very refreshing.
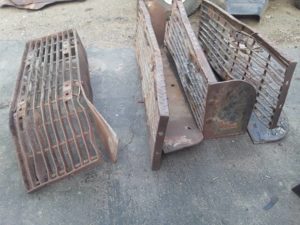 As previously reported, the front and rear foot-boards were totally trashed when we got the locomotive. Carl was able to salvage the mounting brackets and foot guards but there was no way he could save the foot-board treads. They were mangled beyond reasonable repair.
Fortunately, the foot treads were a standard size and new ones were purchased. Carl trimmed them where needed and added the correct mounting bolt tabs. All four foot-boards are now remounted on the locomotive.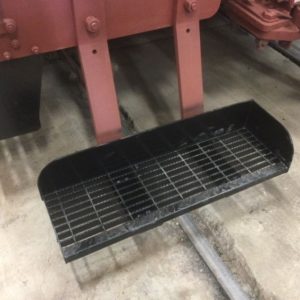
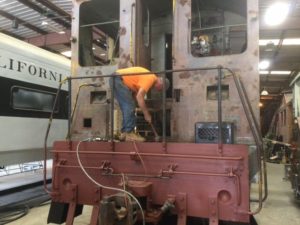
Carl is now working on the hardest part of the sheet metal work. The rear outside cab wall has a number of areas where the sheet metal is rusted through. It’s obvious that rain had accumulated inside the wall for many years due to bad window seal gaskets. The only option is to remove large sections of the outer wall and weld in new material. The area below the door and to both sides of it have to be replaced.
 Carl’s approach was to use a thin cut-off abrasive disc and cut through the sheet metal. The problem with that is that there is a number of vertical backing posts hidden behind the sheet metal. And the sheet metal was then welded to those support posts.

The welds had to be broken loose using a chisel and sledgehammer. They do break loose but it’s a lot of work.
After the rear wall is finished, the hood will need repairs. At some time in its past, most likely at the scrap yard, something very heavy was dropped on one of the exhaust stacks and crushed it and the surrounding area of the hood. That area will require a lot of straightening or replacement.
Once Richard and John have the Diesel engine operational, they will test it using the new electrical load bank. The intent will be to run the engine hard enough to get it up to temperature and leave it running at that power level for at least 30 minutes. The engine will then be shut down to cool and the exhaust manifold inspection ports will be reopened to examine them for pooled oil.
If we are correct in our thinking, there should be little or no oil in the manifolds after a hard hot run. If there is, then it indicates that unburned oil is being blown out the exhaust while running. If there is little or no oil present, then that pretty well tells us that oil accumulation in the exhaust manifold happens after the engine is shut down and oil from the upper crankcase drains down past the upper piston rings and puddles on the lower pistons. That oil then gets spit out into the exhaust manifold as soon as the engine is started again.
If we find that the engine will run hot and clean, and not be spitting oil out the exhaust, then that will help define how the engine can be operated in the future. But it also means that we will have to “burn it out” using the load bank almost every time that that it is planned to be used in regular service.
We have gone to a lot of expense and labor to clean out the exhaust manifolds and snubbers (mufflers) and can’t let them get built up again with unburned oil and carbon. If we keep them burned clean then most likely the locomotive can be used in service at the museum.
After the engine work is completed, Richard and John will move onto other projects in Diesel Service. The rest of the crew will then focus on refurbishing the cab, painting the locomotive, and reinstalling the windows.
– Dave Althaus