Diesel Service Report, November 7th, 2020
SF560 Fairbanks Morse H12-44 Refurbishment Project
We still need help funding this project. This is a direct link to the museum’s web site for donating. Our goal is to raise $40,000 to save this very historic locomotive.
https://socalrailway.org/collections/santa-fe-railway/560-details/
The cleaning of generator armatures and brushes and brush holders is complete. Thanks to John Salvini for many dedicated hours of tedious work. A few brushes are getting short on the main generator and those will be replaced as soon as replacements can be purchased.
The locomotive was pulled out of the barn Saturday and the Diesel engine started. There is still a problem with the main generator loading. That will be investigated this week.
The air compressor governor was not able to control the unloader valves in the compressor and its not clear yet if the unloader valves are giving a problem or if the governor has an issue. The plan will be to try and operate the unloaders using shop air. If shop air can turn the unloaders on and off, then the problem will most likely be with the compressor governor. This governor is unlike any that we have seen.
As an alternative, we have the option of mounting a more common version by the compressor if we need to. The compressor is also an uncommon type. It is air cooled rather than liquid cooled. Apparently, this type of compressor was noted for having major problems with unloaders. Previously Carl Pickus tried to remove one of the unloaders for inspection but found that they were very difficult to remove. If the shop air test proves the unloaders are giving us problems, then there will be no choice but to find a way to remove them. Hopefully, the problem is still with the governor.
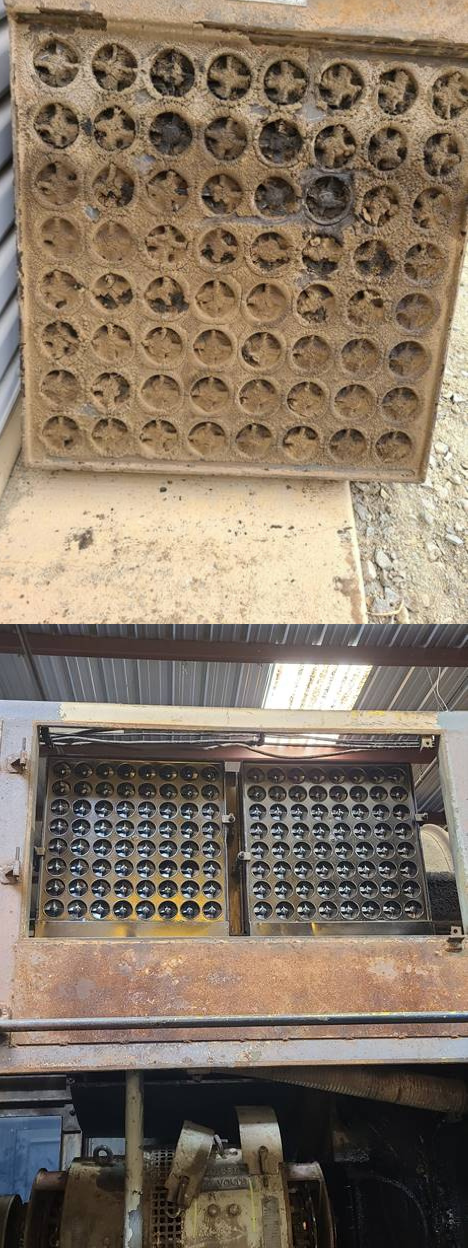
The air intake filters were almost totally plugged before the restoration project began.
The filters were sent out to a professional radiator shop for cleaning and are now reinstalled on the locomotive.
The key to using this locomotive in the future, will be how clean it will run. In the past it spit oil out the exhaust stack. After the exhaust system was cleaned, it stopped spitting oil but after a few hours of operating, it started again.
One of the important questions to answer is how the locomotive performs when it is heavily loaded. There is no way to load it by pulling railroad cars at the museum. The answer that we have is to use an electrical load bank of high power resistors and have the locomotive main generator feed its power to that load bank rather than the traction motors under the locomotive.
The load bank is assembled and in the process of being wired. Of course, load bank wiring is almost a misnomer. These wires aren’t just wires, they are thick cables. The ones that connect from the load bank to the locomotive are very large and must carry a lot of current.
To put it into perspective, the cables that will be used to connect the load bank to the locomotive are made of 650 wires, each of which are #24 gauge wire. These many hundreds of small wires allow the thick cable to still be somewhat flexible.The lug terminals are now crimped onto the cables. The cables are 50 foot long. If we need to, we can parallel cables to operate at higher current levels.
The load bank will be capable of handling up to 2000 amps of current and 1500 volts. That equates to about 4000 horsepower of energy. But the intent is to not use it at that capacity. Rather, the locomotives will be regulated to produce about 75% of their rated horsepower. We don’t want to risk damaging any locomotive by pushing it to its limits. The key is to operate the locomotive under a reasonable load to force the engine to heat up enough to burn out any loose oil in the exhaust system. That is why the load bank is so important for the SF560 project.
SP1474, ALCo S4
For several years, 1474 has been intermittent during transitioning from series to parallel connections of the traction motors. Last week we thought that maybe it was the Control Air piston in one of the contactors that was causing the problem. However, Taka Sakai had previously noticed that when the problem occurred that there was no voltage on the operating coil of the parallel contactor that should have been closing.
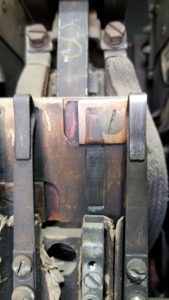
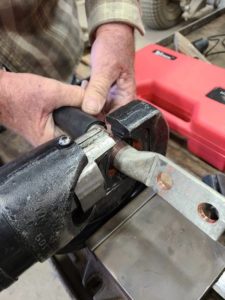
After researching the schematics, he saw that the voltage path for the coil went through a special set of interlocks on the Series contactor. When he started troubleshooting that interlock, he found high resistance in the circuit, even though the interlock contact was tightly closed. He removed the interlock spring arm and cleaned all the surfaces. It seemed to work correctly after that.
To the left is a picture of the interlock. The spring arm on this type of interlock switch is made from some type of steel. Its contact surface was nice and shiny. It moves across a piece of copper to make contact. But the spring arm is held on with two screws and when that was all taken apart, everything seemed to be dirty. Taka cleaned all the parts and it worked correctly during some test runs. Hopefully this has been the elusive problem that has haunted us for years.
This is a link address of a short video showing the contactors when they go through transitioning.
https://photos.app.goo.gl/HfTApj8bwdyQC1xZ7
USAF 1601, GE80 Ton Switcher
The locomotive had two faulty truck combos. Both of those traction motors had been disconnected prior to the locomotive coming to the museum. Inspection revealed that both of those motors had damaged commutators. Replacement parts were purchased as part of buying a complete truck. However, one of the newly purchased gear case assemblies, from the new truck, had a very severely worn pinion gear on the traction motor. The pinion could not be removed without having the correct pinion removal tools. The final solution was to remove one of the original traction motors and see if a professional motor repair shop could repair the commutator. The armature was taken to San Diego where the motor shop was able to save it. And, it was the armature with the most severe armature commutator damage. 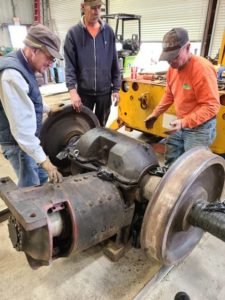 The motor shop was able to save the armature. They removed roughly 1/8″ of commutator copper before reaching the undamaged areas. And, the commutator still has 3/8″ of copper left before reaching the condemning limit. Carl Pickus brought the armature back to the museum and reinstalled it back into the motor housing. Then he, Frank Kunsaitis, and Doug Newberry, reinstalled the motor assembly back onto the gear case.
After the traction motor was remounted, they started cleaning the gear case mounting surfaces. Once those are cleaned, gasket quality RTV will be applied and the gear case cover will be reattached. Then the traction motor brush holders and brushes will be reinstalled. When that is complete, the gear case and motor combo will be ready to put back into the locomotive truck. Hopefully, this will complete the truck work for this locomotive. We knew there were problems but had no idea it would get this complicated.
OERM 19556, ALCo, RSD1
For some time now, the fuel pressure would not build up quickly. However, the fuel level in the tank was low, which meant the fuel lift pump had to work extra hard to suck fuel through the preliminary filters and then to the engine. Normally when this happens, we attribute the problem to a worn fuel pump. However, earlier this year we had a similar problem with SP1474 and that turned out to be a clogged fuel filter.
This time, Frank Kunsaitis decided to test the filter theory before going through the effort of replacing the fuel pump. There are two filters in the suction side of the system. He removed one and then turned on the pump again. The pressure went right up to 45 psi. When he switched to the remaining filter, the pressure problem showed up again. Obviously, the problem was two very dirty filters. For now, the locomotive will rely on the final filter which is located on the engine. It is a Cuno type finger filter and will suffice until we can purchase new suction filters. The locomotive ran fine with the one filter removed but we want to get the new filters reinstalled quickly.
Dave Althaus