Diesel Service Report, June 27th 2020
SF560, Santa Fe Fairbanks Morse Model H12-44M
Work continues to investigate the restoration of this historic locomotive. Assuming that the Fairbanks Diesel engine operates as we think it should, the project restoration proposal will be submitted for approval shortly.
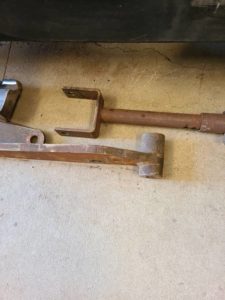
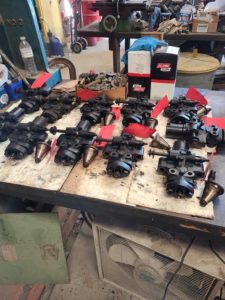 Attempts to start the locomotive last week were unsuccessful due to faulty injection pumps and injection nozzles. John Salvini has now removed all 12 pumps and nozzles for repair or replacement. It appears that all the pumps failed in the same manner. The injection plunger inside the pumps gets stuck when the injection cycle takes place. One pump was sent out for investigation and it was found that the internal parts are damaged beyond use.
This picture (left) shows the 11 sets of pumps and nozzles that John removed this past week.
We are now reviewing several possible solutions. Rebuilding the pumps could cost between $6,000 and $10,000. We may have an alternate approach that would be less costly but we don’t know yet. Regardless, as mentioned before, working with Fairbanks Morse engines gets expensive very quickly. Luckily, we have received some very generous donations but not enough yet to totally cover the cost of rebuilding the pumps.
Carl Pickus reported that the first air cleaner was cleaned at a commercial radiator shop using an ultrasonic cleaner and caustic solution. The radiator shop was able to clean the first of the four air filter panels, and Carl has delivered the remaining three to the radiator shop to be cleaned.
OERM 1956 & 1975
Frank Kunsaitis removed water and oil from two journal boxes in 1956. He then installed new journal pads in those two journal boxes plus the one that he had worked on the previous week in 1975. Hopefully, the new pads and fresh oil will help solve the overheating journal issues.
It was also reported that the #5 cylinder on 1975 was smoking a lot. What that means is that while the engine is running, excessive white smoke comes out of the exhaust stack. These engines have individual cut-out devices so any cylinder can have its fuel shut off totally by twisting the cut-off lever. When the #5 cylinder fuel is shut off, the smoke goes away.
Historically, 1975 has been a problem for us. When it arrived at the museum, it was often looked at as just being a parts source for 1956. However, in the early 1990’s, with a little work, we were able to get 1975 running again. But it never burned the fuel cleanly and always smoked when first started. We eventually found that we could eliminate the smoke if we cut out certain cylinders. Sometimes, if it was really cold out, we would need to cut out three cylinders before the smoke would clear up. But that is half the engine being shut down. Then, once the engine warmed up, the cylinders could be cut back in and the engine would run reasonably clean.
We have changed injection nozzles to see if that was the issue. It wasn’t. Injection pumps could be the issue, but we tried changing them a number of years ago and that didn’t solved the problems either. The other prime candidates are exhaust valves that aren’t seating properly. When that happens, the compression in the cylinder isn’t high enough and the heat of compression doesn’t get high enough to cause the atomized fuel to burn. Someday, hopefully, we will have the time to track this down.
USAF 1601
The new truck, which was purchased in Kansas City, arrived and work began investigating what was going to be required to replace the two damaged traction motors that were under 1601. The major concern was that the gear ratios may be different between the new truck gear cases and those under 1601.
Carl and Doug Newberry rolled the trucks back and forth while counting the turns of the traction motor while the wheel sets turned one full revolution. Very fortunately, the gear ratios are the same. That means that we will be able to exchange complete combos, which are made up of the wheels and axle, the double reduction gear case, and the traction motor, all bolted together. It’s a difficult job but very straight forward.
 If the gear ratios had not been identical, we would have had to swap traction motors. That is much more difficult due to the special procedures required to set the ring and pinon gear lash exactly correct. We have the documents showing how to do it, and from those documents we quickly realized that it would be a lot better if we were able to change out complete combos. And that is what is now planned.
During the process of removing brake rigging, Carl and Doug found damaged brake rigging bars that would not have been noticed if the trucks weren’t out from under the locomotive. One brake rigging bar was bent and the other was broken. Carl heated the bent one and was able to straighten it. He welded the broken one back together.
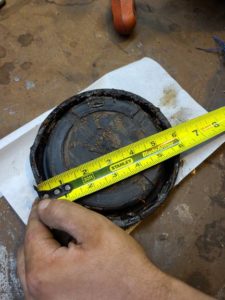
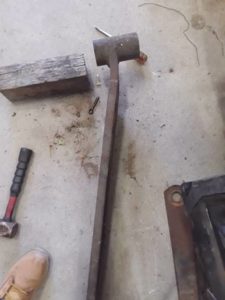
While the trucks are out from under the locomotive, the brake cylinders will be refurbished with new cylinder cups. It also appears that at least one of the springs inside one of the cylinders is broken. Fortunately, we now have spare springs available in the replacement truck that just arrived.
This picture (right) shows one of the 6” cups that was removed. It is somewhat deformed in one area. They probably would have worked for awhile, but their location would make it extremely difficult to work on after the trucks are back under the locomotive. Installing new cups now will save us a lot of work sometime soon.
SP1006
When we began the restoration of SP1006 years ago, we were told that it would be best if we never ran the engine because spare parts for a 6-567U model engine were essentially impossible to find. And we could invest many years of work and a lot of money into a project that could fail, and we wouldn’t be able to repair it.
Obviously, we still continued with the project. But the thought of a possible engine failure has been nagging us all along. Then, two weeks ago, we saw an advertisement for an EMC, 6-567U model engine that was an exact match for ours. The price was $6000. Needless to say, we didn’t have that money in the SP1006 account and didn’t think we could make it happen. Discussions with the owner resulted in he and his partner offering to donate the engine to us if we would pay for transportation. They knew it would be going to a good home. The $2,200 for transportation was quickly agreed to and the engine was loaded on a semi and shipped to us.
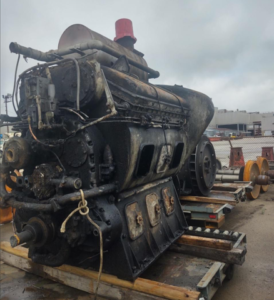 Carl and Fed Nicas unloaded the engine onto one of our spare flat cars and we now have the exact spare parts for anything that we would ever need in the Diesel engine in SP1006. That’s amazing. Once the engine is located where it will reside long term, it will have a small box shelter built around it to keep it out of the weather. Prior to that, all the openings in the engine will be closed up with covers. This is the our new engine. It looks rough and dirty, but trust me, it is the jewel we have been looking for.
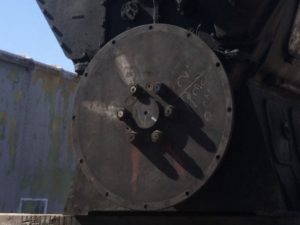 Once the engine was unloaded, we took some pictures of it (right). One of those pictures was of the flywheel. That picture helped explain something that has bothered us from before the restoration of 1006 was finished. Last year, during installation of six new injectors, we found that the engine timing was 30 degrees off from where it should be. After thinking about it, we guessed that it was caused by someone previously mounting the flywheel incorrectly. This picture shows 12 evenly spaced holes around a perfect circle. Obviously if they installed the flywheel one bolt hole off from where it should have been, the error would be 30 degrees. And that is exactly the angle error that we found.
USAF 7441
Tom Platten was able to buy the correct green thick Naugahyde material that was used on the arm rests and seat in the locomotive. He has been working on reupholstering those. Ray Ballash also identified where additional material was stored at the museum and Fred Nicas retrieved that for Tom. If it isn’t the correct material, it will be placed near the sewing machine that is used for heaving duty sewing.
For some time now, questions have risen regarding the health of the batteries in this locomotive. They aren’t very old. During the week, Brice Brummett mentioned that he was unable to start the rear engine because the batteries were too weak. After charging them for a while, the engine did start. But this brings up the question as to why this engine has had perpetual issues with batteries.
The story goes back to the 1940’s. Back then, alternators had not been designed and built because silicon power diodes were still about 20 years from being invented. Modern alternators on cars and trucks, generate three phase alternating voltage. That voltage is then rectified by several diodes which convert that AC voltage to DC, just like the old generators used to make. But the alternators are so much more efficient that they can produce at least five times as much power and weigh even less than a DC generator.
So back in the 1940’s, it was common for generators to barely put out enough power to keep batteries charged. That is unless the engine RPM was increased above idle. That is exactly what the situation is with 7441. It has generators that just don’t produce enough voltage if the Diesel engine is idling. Once the throttle is opened a little, then the batteries do begin to charge. The problem is that the engines in 7441 are at idle RPM almost all the time. As a result, the batteries never get fully charged.
There are a few options. First is to routinely connect a battery charger to the locomotive. That is often not possible because of where it is parked, away from electrical outlets. The second approach would be to replace the generators with alternators. Cummins did this a few years later to newer models. But it would be exceedingly difficult on 7441 because of the location and design of the generator mounting system. And a third option would be to place a solar panel flat on the roof. Of course, that isn’t in keeping with preserving artifacts in their original form, but it would solve the problem and the panel would be almost invisible from the ground. That would be the simplest and most reliable method near term.
Dave Althaus